Installing Building-Integrated Photovoltaics (BIPV) is fundamentally different from traditional solar. You aren’t just mounting panels; you are constructing a building envelope. The installation must satisfy two masters: Electrical Safety (IEC standards) and Structural Integrity (Building codes for wind load, water tightness, and fire safety).
This guide categorizes and details the primary BIPV installation methods used in modern curtain walls and roofing systems, helping you choose the right structural approach for your project.
Table of Contents
Quick Summary: The 4 Main BIPV Mounting Approaches
BIPV installation generally falls into four structural categories based on how the load is transferred to the building:
Unitized System (Prefabricated): Modules are assembled into large panels in a factory and hung on the building. Fastest on-site installation.
Stick System (Component-based): Mullions and transoms are installed on-site first, followed by the BIPV glass. Most common for custom designs.
Point-Supported (Spider System): Glass is held by stainless steel “spiders” or clamps. Offers maximum transparency.
Rain-Screen Cladding (Ventilated Facade): BIPV panels are hung on an outer rail system with an air gap behind for cooling.
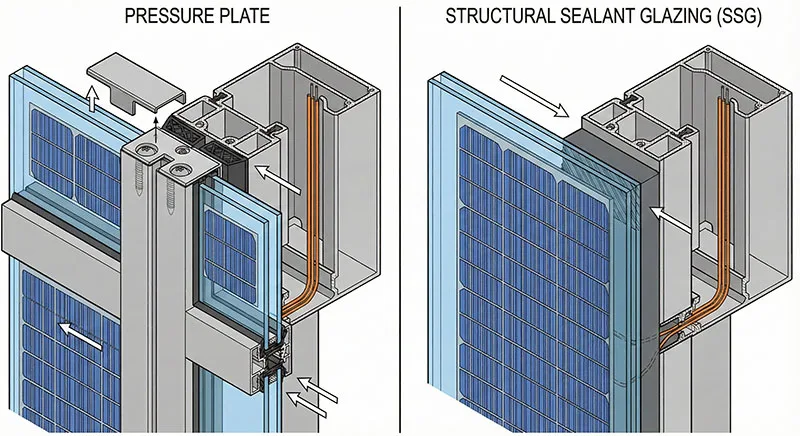
1. The Stick System (Pressure Plate / Hidden Frame)
Best For: Low-to-mid rise buildings, complex geometries, and cost-sensitive projects.
Crystalline silicon is the mature technology found in 90% of standard solar panels. In BIPV, however, we don’t just bolt on a framed panel; we modify the cell integration.
Installation Mechanics:
Framing: Vertical mullions are anchored to the floor slabs. Horizontal transoms are connected between them.
Glazing (The BIPV Part):
Pressure Plate (Exposed Frame): The BIPV glass is placed against the gaskets. An aluminum pressure plate is screwed from the outside to clamp the glass, followed by a decorative snap-on cover.
Structural Sealant Glazing (SSG / Hidden Frame): The BIPV glass is bonded to a sub-frame using high-strength structural silicone. From the outside, it looks like a seamless sheet of glass with no visible metal.
Wiring Path: Cables are routed through pre-drilled holes into the hollow chambers of the vertical mullions, protecting them from weather.
Pro Tip: For SSG systems, the chemical compatibility between the silicone sealant and the PV module backsheet is critical. Incompatible materials can cause the module to delaminate over years.
2. The Unitized System (Prefabricated)
Best For: High-rise skyscrapers, large-scale projects, tight construction schedules.
In this method, the BIPV glass, aluminum frame, and even the internal wiring are pre-assembled in a factory into large “units” (often 1-story high).
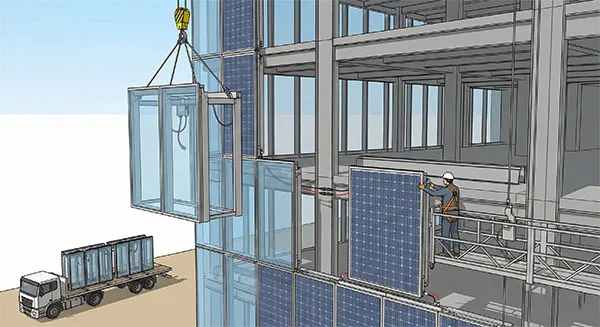
Installation Mechanics:
Factory Assembly: Quality control is higher because sealing and bonding happen in a clean environment.
On-Site Process: The units are trucked to the site and lifted by cranes. They interlock with each other using a male-female joint system.
Electrical Connection: Installers simply plug in the “quick connectors” between units as they stack them, significantly reducing electrical labor time on site.
3. Point-Supported System (Spider Fitting)
Best For: Atriums, canopies, lobby entrances, and “high-tech” aesthetics.
This method eliminates heavy frames. The BIPV glass is bolted to a lightweight steel structure or tension cables.
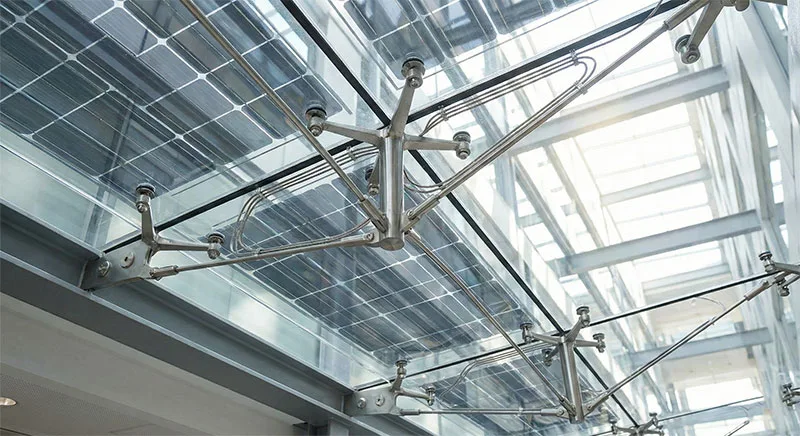
Installation Mechanics:
Drilling: BIPV glass for this system is usually double-tempered and pre-drilled with tapered holes at the corners.
Fixing: Stainless steel “routels” (bolts) pass through the glass holes and connect to “spider” arms.
Flexibility: The spider arms are designed to articulate (move slightly), absorbing wind loads and thermal expansion without breaking the glass.
Wiring Challenge: Since there are no mullions to hide wires, cables must be routed along the spider arms or hidden inside the silicone sealant of the glass joints (using ultra-thin ribbon wiring).
4. Ventilated Facade (Rainscreen Cladding)
Best For: Renovation projects (Retrofit) and improving building insulation.
This is a “dry-hanging” method where BIPV panels act as the outer skin, protecting the actual building wall.You can view the BIPV Facade System
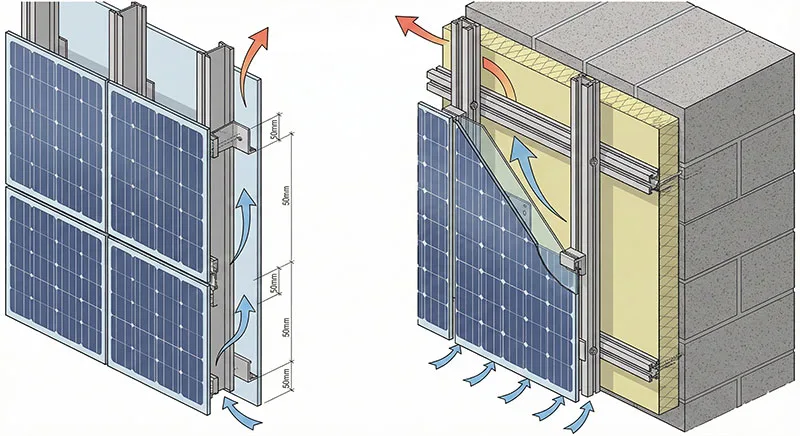
Installation Mechanics:
Sub-structure: An aluminum or steel grid is bolted to the existing masonry wall.
Air Gap: A gap (typically 20mm – 100mm) is left between the BIPV panel and the insulation layer.
Mounting: BIPV panels are attached using undercut anchors (hidden on the back) or visible clamps.
The “Chimney Effect”: As the solar panels heat up, the air in the gap rises and vents out the top. This natural airflow cools the solar cells (increasing efficiency) and removes moisture from the building wall.
Comparison: Which BIPV Mounting Fits Your Project?
| Feature | Stick System | Unitized System | Point-Supported | Ventilated Facade |
|---|---|---|---|---|
| Installation Speed | Slow (On-site assembly) | Fastest (Plug & Play) | Medium | Fast |
| Cost | Low - Medium | High (Initial tooling) | High | Medium |
| Waterproofing | Good (Depends on site labor) | Excellent (Factory sealed) | Fair (Depends on sealant) | Open joint (Rainscreen) |
| Aesthetics | Visible frames | Seamless capability | High transparency | Solid wall look |
| Wiring Concealment | Easy (In mullions) | Easy (Pre-wired) | Difficult | Easy (Behind panels) |
BIPV Mounting Critical Technical Considerations (The "Invisible" Details)
To ensure your BIPV Mounting passes inspection and lasts 25+ years, focus on these details:
1. The “W.I.B” Solution (Wire In Box)
Traditional junction boxes are too thick for BIPV. Modern installations use:
Edge-mounted Junction Boxes: Located on the side of the glass, burying directly into the window frame.
Rear-mounted Micro-boxes: Thin (<12mm) boxes that fit within the sealant depth.
2. Thermal Expansion Compensation
Glass and aluminum expand at different rates.
Requirement: Installation blocks (setting blocks) must be made of EPDM rubber with the correct Shore hardness (usually 80-90) to prevent glass breakage during temperature swings.
3. Drainage Paths
Even “waterproof” systems can leak.
Requirement: The mullion system must have a “weep hole” or drainage channel design. Any water that bypasses the outer gasket must be channeled out of the frame at the bottom, rather than pooling inside where the electrical connectors sit.
Need a detailed CAD drawing or node diagram for one of these systems? Contact us to help you.